


Hi, crafty friend! If the thought of making all your holiday cards feels overwhelming, you’re going to love this week’s tutorial.
I’ll show you how to create beautiful, handmade Christmas Cards in just 3 easy steps for no stress, all joy crafting!
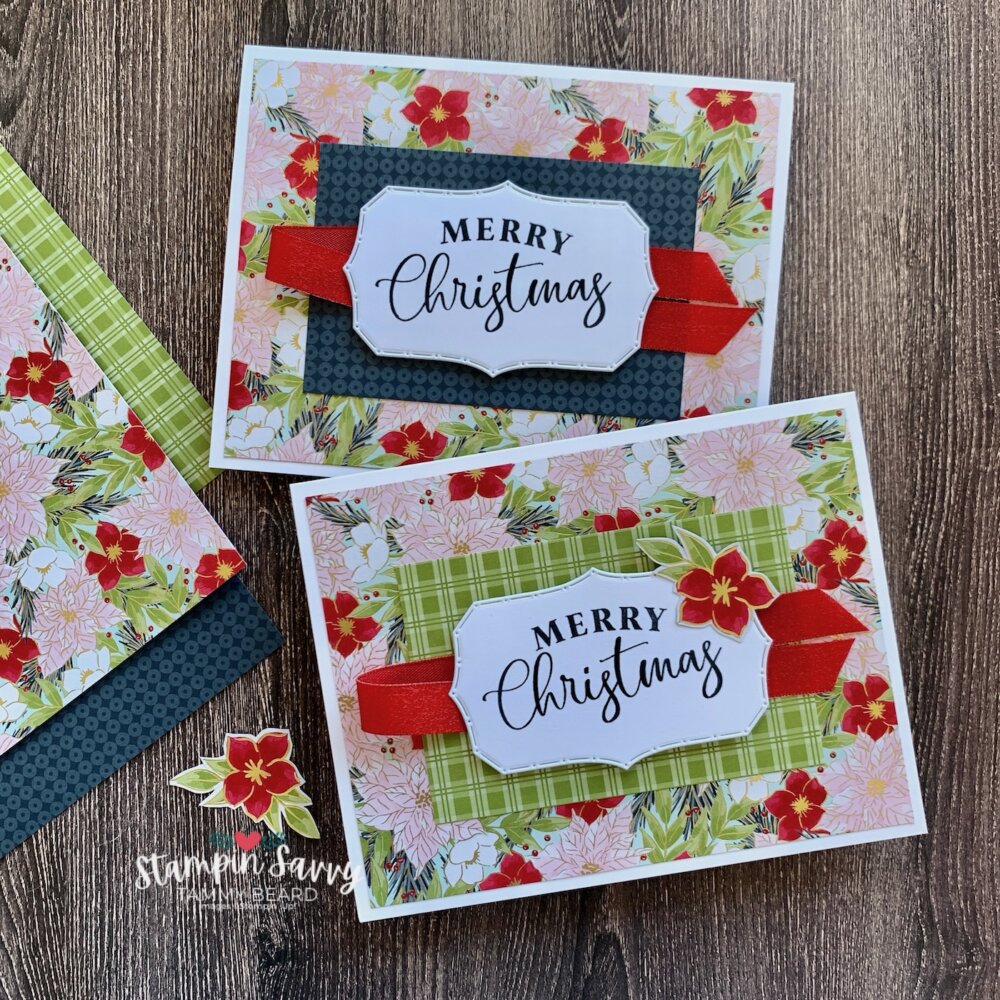
These simple, elegant designs using the Traditions of Christmas Suite by Stampin’ Up!® are perfect for paper crafters who want beautiful results without complicated techniques or lots of supplies.
SAVVY SHOPPER ALERT!
Free Shipping on $75* Stampin’ Up! Orders October 22-24, 2025
Starts NOW… 3 Days Only! SHOP HERE
*Net product total before taxes and after any discounts/rewards

OCTOBER SAVVY SHOWCASE:
Traditions of Christmas Suite
Get the entire collection of coordinating products or choose your favorites!

CHRISTMAS GREENERY
STAMP & DIE BUNDLE
Don’t let the name fool you – it can be used year ’round!

TRADITIONS OF CHRISTMAS 12″ DESIGNER PAPER
Gorgeous Gold-Foiling! Use the Christmas Greenery Dies to cut out ready-to-use images!

TRADITIONAL LABELS
STAMP & DIE BUNDLE
All-purpose dies with mix-and-match holiday sentiment stamps!
TUTORIAL-Handmade Christmas Cards in 3 Simple Steps
What I love! The ready-to-use, gold-foiled images from the TRADITIONS OF CHRISTMAS Specialty Designer Paper (below) and sentiments from the GREETINGS FOR YOU Mix-and-Match Ephemera Pack are what make this card so easy… and stunning!

CUT & PREP (Width x Length)
- Basic White Thick Cardstock
- Card Base: 5-1/2″ x 8-1/2″
- On Paper Trimmer, score a full sheet of 8-1/2″ x 11 cardstock on short side at 4-1/4″; turn and cut on long side at 5-1/2″ to create two card bases per sheet. Repeat for the total number of cards you’re making. Burnish each fold with Bone Folder.
- Card Base: 5-1/2″ x 8-1/2″
- TRADITIONS OF CHRISTMAS Specialty Designer Series Paper
- Floral Bouquet Die-Cut: With coordinating die from Christmas Greenery, cut (1) floral bouquet per card from designer paper on Stampin’ Cut & Emboss Machine (or similar). Cut enough for the total number of cards you’re making. (see Photo 2 Above)
- One sheet will cut 17 full floral bouquets in 3 colors; there’s 2 sheets per package- enough for 34 cards!
- No Waste! Cut the partial images along the bottom edge, too… I’ll show you how to use them on a card next week!
- One sheet will cut 17 full floral bouquets in 3 colors; there’s 2 sheets per package- enough for 34 cards!
- Background Label: With Traditional Label Dies, cut one label per card from patterns on reverse side of foiled images. This is a great way to use leftover scraps! Cut enough for the total number of cards you’re making.
- Substitute cardstock or any designer paper in a coordinating color, if you prefer to use the foiled side of this designer paper. The best part of Stampin’ Up! color-matched products is the ability to mix-and-match!
- Floral Bouquet Die-Cut: With coordinating die from Christmas Greenery, cut (1) floral bouquet per card from designer paper on Stampin’ Cut & Emboss Machine (or similar). Cut enough for the total number of cards you’re making. (see Photo 2 Above)

ASSEMBLY
- STEP 1) Adhere the die-cut label to the center of the card front. This ‘grounds’ the flowers to the card and provides the backdrop so they stand out!
- STEP 2) Apply Stampin’ Dimensionals to the back of the floral bouquet die-cut; adhere centered on above label. The gold-foil accents and beautiful image makes an instant focal point- with no coloring needed!
- STEP 3) Select a single line, horizontal sentiment from the GREETINGS FOR YOU Mix-and-Match Ephemera Pack; apply a Mini Stampin’ Dimensional to each end and adhere over floral bouquet above.
- Note: These are stickers, but because we’re using dimensional foam to lift them up off the card front, leave the paper backing in place.
- There’s plenty of variety to also use these sentiments on the inside! (Photo 4 below)

EMBELLISH
- Adhere three coordinating Traditional Sparkling Sequins*… done!
- *Designed to color-coordinate with the Traditions of Christmas Designer Paper, they include 3 colors, in 3 sizes! And they’re FLAT for hassle-free mailing!

STEP-IT UP OPTION
Want to step-it up with some additional pattern and texture? Add a simple 4th step!
- Basic White Cardstock: 4″ x 5-1/4″
- Emboss with your favorite embossing folder on the Stampin’ Cut & Emboss Machine (or similar). Adhere centered to card front. Complete the 3-Step Assembly above.

I hope you enjoyed this 5th week of free project tutorials for this gorgeous suite of coordinating products!
If you’re crafting along with me, you’ll have used all the patterns in the designer paper pack now. And enjoy a big stack of gorgeous Christmas cards ready to give… wooHOO!
Join me next week when we take a wee break from holiday crafting to explore how to use this suite of products year ’round for birthdays, get well cards and more!
If you missed any of the previous posts featuring the Traditions of Christmas Suite, I’ve linked them below. Don’t miss the additional 8 exclusive projects from The Papercraft Collective Design Team (free gift this month with qualifying order)… happy crafting!
- Fast & Festive: Quick Christmas Card Ideas For Traditions of Christmas!
- Simple Christmas Cards You Can Make & Mass Produce With Ease!
- Stunning Handmade Cards In Under 30 Minutes!
- Cozy Fall Card Ideas With Stampin’ Up! Favorites Past & Present!
SHOP PROJECT SUPPLIES
Ready to take your holiday crafting to the next level? Order from the Traditions of Christmas Suite today and craft along with me—your handmade cards will be finished before the season’s rush even begins!
Product List![Traditions Of Christmas Suite Collection (English) [ 165877 ]](https://i0.wp.com/assets1.tamsnetwork.com/images/EC042017NF/165877s.jpg?w=120&ssl=1 "Traditions Of Christmas Suite Collection (English) [ 165877 ]")
![Traditions Of Christmas 12" X 12" (30.5 X 30.5 Cm) Specialty Designer Series Paper [ 165853 ]](https://i0.wp.com/assets1.tamsnetwork.com/images/EC042017NF/165853s.jpg?w=120&ssl=1 "Traditions Of Christmas 12\" X 12\" (30.5 X 30.5 Cm) Specialty Designer Series Paper [ 165853 ]")
![Christmas Greenery Bundle [ 165873 ]](https://i0.wp.com/assets1.tamsnetwork.com/images/EC042017NF/165873s.jpg?w=120&ssl=1 "Christmas Greenery Bundle [ 165873 ]")
![Traditional Labels Bundle (English) [ 165865 ]](https://i0.wp.com/assets1.tamsnetwork.com/images/EC042017NF/165865s.jpg?w=120&ssl=1 "Traditional Labels Bundle (English) [ 165865 ]")
![Traditional Sparkling Sequins [ 165875 ]](https://i0.wp.com/assets1.tamsnetwork.com/images/EC042017NF/165875s.jpg?w=120&ssl=1 "Traditional Sparkling Sequins [ 165875 ]")
![Greetings For You Mix & Match Ephemera Pack (English) [ 166208 ]](https://i0.wp.com/assets1.tamsnetwork.com/images/EC042017NF/166208s.jpg?w=120&ssl=1 "Greetings For You Mix & Match Ephemera Pack (English) [ 166208 ]")
![Basic White 8 1/2" X 11" Thick Cardstock [ 159229 ]](https://i0.wp.com/assets1.tamsnetwork.com/images/EC042017NF/159229s.jpg?w=120&ssl=1 "Basic White 8 1/2\" X 11\" Thick Cardstock [ 159229 ]")
![Basic White Medium Envelopes [ 159236 ]](https://i0.wp.com/assets1.tamsnetwork.com/images/EC042017NF/159236s.jpg?w=120&ssl=1 "Basic White Medium Envelopes [ 159236 ]")
![Paper Trimmer [ 152392 ]](https://i0.wp.com/assets1.tamsnetwork.com/images/EC042017NF/152392s.jpg?w=120&ssl=1 "Paper Trimmer [ 152392 ]")
![Stampin' Cut & Emboss Machine [ 149653 ]](https://i0.wp.com/assets1.tamsnetwork.com/images/EC042017NF/149653s.jpg?w=120&ssl=1 "Stampin' Cut & Emboss Machine [ 149653 ]")
![Multipurpose Liquid Glue [ 110755 ]](https://i0.wp.com/assets1.tamsnetwork.com/images/EC042017NF/110755s.jpg?w=120&ssl=1 "Multipurpose Liquid Glue [ 110755 ]")
![Mini Stampin' Dimensionals [ 144108 ]](https://i0.wp.com/assets1.tamsnetwork.com/images/EC042017NF/144108s.jpg?w=120&ssl=1 "Mini Stampin' Dimensionals [ 144108 ]")
![Stampin' Dimensionals [ 104430 ]](https://i0.wp.com/assets1.tamsnetwork.com/images/EC042017NF/104430s.jpg?w=120&ssl=1 "Stampin' Dimensionals [ 104430 ]")
THIS WEEK’S SAVVY SHOPPER SPECIALS


PIN FOR LATER
Hover over any photo in today’s post and click the red Pinterest SAVE logo in the upper left corner to save this tutorial to your favorite Pinterest board for later!
BEFORE YOU GO
- Get new project tutorials delivered free to your in-box! Subscribe Here (US only)
- Visit the GALLERY for more card ideas and free tutorials
- Enjoy this post? Leave a comment below… I love to hear from you!
Thanks for supporting our small family business!


