


Hi, crafty friend! If you love sending handmade Christmas cards, but don’t want complicated designs, you will love this week’s free tutorial.
I’ll show you how to make simple Christmas cards you can mass produce with ease — so you can share beautiful, heartfelt, handmade greetings your family & friends will love.
You’ll find step-by-step directions for creating the featured cards, making it easy to craft with confidence and get ahead on your holiday list!

It’s week 3 of 5 for project ideas featuring the Traditions of Christmas Suite by Stampin’ Up! If you missed the previous tutorials, find them below:
- Stunning Handmade Cards In Under 30 Minutes!
- Cozy Fall Card Ideas With Stampin’ Up! Favorites Past & Present!
OCTOBER SAVVY SHOWCASE:
Traditions of Christmas Suite
Get the entire collection of coordinating products or choose your favorites and craft along with me throughout the month to create a stack of beautiful holiday cards ready to give by the end of October!

CHRISTMAS GREENERY
STAMP & DIE BUNDLE
Don’t let the name fool you – it can be used year ’round!

TRADITIONS OF CHRISTMAS 12″ DESIGNER PAPER
Gorgeous Gold-Foiling! Use the Christmas Greenery Dies to cut out ready-to-use images!

TRADITIONAL LABELS
STAMP & DIE BUNDLE
All-purpose dies with mix-and-match holiday sentiment stamps!
CARD TUTORIAL
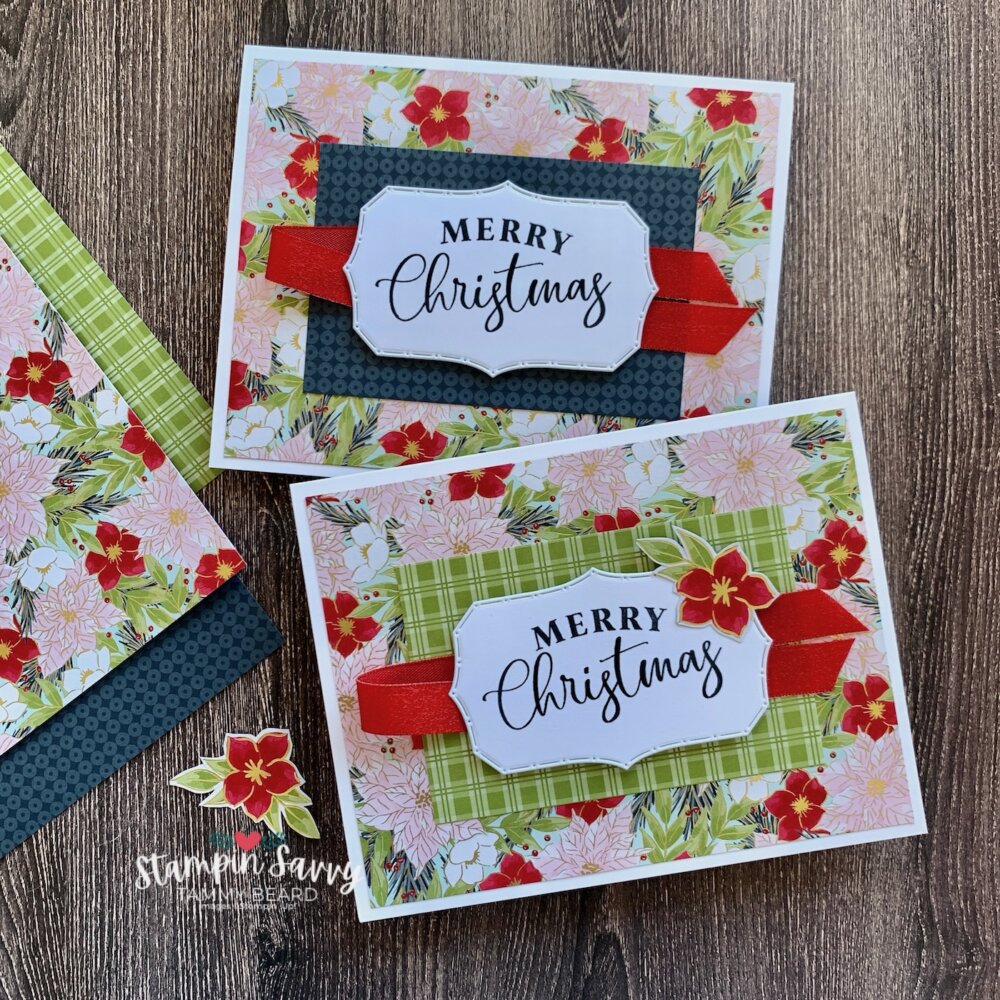
What I love! The stunning Traditions of Christmas Specialty Designer Paper once again takes center stage with this simple design that wows with gold foil accents, coordinating patterns and matching colors!

CUT & PREP (Width x Length)
We’ll be using six sheets from the designer paper pack to make up to 24 cards. First find the three foiled patterns (for the primary, bottom layer), then use additional sheets of the reverse sides for the smaller, top layer (shown in photos 2, 5 & 6).
- Basic White Thick Cardstock
- Card Base: 5-1/2″ x 8-1/2″
- On Paper Trimmer, score a full sheet of 8-1/2″ x 11 cardstock on short side at 4-1/4″; turn and cut on long side at 5-1/2″ to create two card bases per sheet. Repeat for the total number of cards you’re making.
- Burnish each fold with Bone Folder.
- Sentiment Label: 4-1/4″ x 11″ (half-sheet)
- On Stampin’ Cut & Emboss Machine (or similar) die-cut one label per card with Traditional Label Dies (cut 6 labels from this half-sheet). Repeat until you have enough cut for all cards.
- Card Base: 5-1/2″ x 8-1/2″
- TRADITIONS OF CHRISTMAS Specialty Designer Series Paper:
- Bottom Layer: 5-1/4″ x 4″ (Primary Pattern with Gold Foil)
- From one 12″ sheet, cut at 4″, repeat. Stack all three strips together on Paper Trimmer and cut on long side at 5-1/4″; repeat for a total of 6 pieces.
- Repeat with all three patterns for a total of 18 pieces*.
- Top Layer: 3-3/4″ x 2-1/2″ (Accent Pattern from Reverse Side)
- From one 12″ sheet, cut at 2-1/2″, repeat twice. Stack all three strips together on Paper Trimmer and cut on long side at 3-3/4″, repeat twice for a total of 9 pieces*.
- Repeat with additional patterns for enough pieces to match the same number of Bottom Layers. Patterns can be mixed-and-matched!
- *Savvy Cutting Tip: The remaining 4-1/2″ x 12″ piece can be flipped back to the foiled side and used to cut (2) additional Bottom Layers (for a total of 8 for each primary pattern… this comes closest to even numbers of both layers).
- Red Flowers: Hand-cut one per card, directly from paper [SEE PHOTO 3 BELOW]
- Note: The flowers can be cut with the Christmas Greenery Dies, however the die only cuts the flower- not the printed leaves. I recommend hand-cutting these with small scissors- they’re quick & simple!
- Bottom Layer: 5-1/4″ x 4″ (Primary Pattern with Gold Foil)
- Real Red Ribbon: 9″
- Cut one piece per card

STAMPING
- Stamp sentiment(s) of choice from Traditional Labels on pre-cut labels with Secret Sea Classic Stampin’ Pad.

HOW TO STAMP IN BULK- The Quick & Easy Way! [See Photo 4 Above]
- USE A STAMPING TOOL (shown- MISTI by My Sweet Petunia)
- It enables you to repeat stamp accurately and quickly
- In addition to sentiment labels, use it also to stamp the sentiment inside your card, as well as your ‘watermark’ stamp on the back of the card. Don’t forget the envelopes… it’s quick and easy to stamp them to match, too!
- CREATE A TEMPLATE FOR DIE-CUT OR PUNCHED PIECES
- This is especially helpful when you’ve pre-cut your labels, or when you’re stamping with more than one stamp, like I’ve done [with the mix-and-match sentiments from Traditional Labels].
- Make A Template: The example in Photo 4 above shows a 4-1/4″ x 5-1/2″ piece of white cardstock, die-cut from the center with the same die used to cut the sentiment labels [Traditional Labels].
- Place a pre-cut label within the template opening, stamp MERRY and remove. Place a new label in opening and repeat as many times as needed, until all labels are stamped.
- Position the CHRISTMAS stamp in place and stamp each label, repeating the same process above. You’ll be surprised how fast it goes!
- This saves sooo much time, as you’re only positioning and cleaning your stamp ONCE, and the positioning of each die-cut label within the template is quick & easy!

ASSEMBLY
- Adhere Bottom Layer of Designer Paper, centered on card. Repeat with Top Layer.
- Fold the ribbon in half; place a small dab of double-sided adhesive in the center of the above designer paper to secure the ribbon in place.
- Apply Stampin’ Dimensionals to the back of the sentiment label; adhere centered over ribbon. Trim ribbon ends with sharp scissors, as needed.
- Adhere flower to label; add a Mini Stampin’ Dimensional under any overhang…. done!

Ready to get started? Order the Traditions of Christmas Suite today and craft along with me this month!
With these simple designs and a little creative time each week, you’ll have a stunning collection of handmade Christmas cards finished by the end of October — and you can head into the holidays feeling organized, relaxed, and proud of your creations.❤️
SHOP SUPPLIES TO MAKE FEATURED CARDS
Click any image to add items to your Stampin’ Up! shopping cart …happy crafting!
Product List![Traditions Of Christmas Suite Collection (English) [ 165877 ]](https://i0.wp.com/assets1.tamsnetwork.com/images/EC042017NF/165877s.jpg?w=120&ssl=1 "Traditions Of Christmas Suite Collection (English) [ 165877 ]")
![Traditions Of Christmas 12" X 12" (30.5 X 30.5 Cm) Specialty Designer Series Paper [ 165853 ]](https://i0.wp.com/assets1.tamsnetwork.com/images/EC042017NF/165853s.jpg?w=120&ssl=1 "Traditions Of Christmas 12\" X 12\" (30.5 X 30.5 Cm) Specialty Designer Series Paper [ 165853 ]")
![Christmas Greenery Bundle [ 165873 ]](https://i0.wp.com/assets1.tamsnetwork.com/images/EC042017NF/165873s.jpg?w=120&ssl=1 "Christmas Greenery Bundle [ 165873 ]")
![Traditional Labels Bundle (English) [ 165865 ]](https://i0.wp.com/assets1.tamsnetwork.com/images/EC042017NF/165865s.jpg?w=120&ssl=1 "Traditional Labels Bundle (English) [ 165865 ]")
![Real Red 1/2" (1.3 Cm) Shiny Ribbon [ 165876 ]](https://i0.wp.com/assets1.tamsnetwork.com/images/EC042017NF/165876s.jpg?w=120&ssl=1 "Real Red 1/2\" (1.3 Cm) Shiny Ribbon [ 165876 ]")
![Secret Sea Classic Stampin' Pad [ 165285 ]](https://i0.wp.com/assets1.tamsnetwork.com/images/EC042017NF/165285s.jpg?w=120&ssl=1 "Secret Sea Classic Stampin' Pad [ 165285 ]")
![Basic White 8 1/2" X 11" Thick Cardstock [ 159229 ]](https://i0.wp.com/assets1.tamsnetwork.com/images/EC042017NF/159229s.jpg?w=120&ssl=1 "Basic White 8 1/2\" X 11\" Thick Cardstock [ 159229 ]")
![Basic White Medium Envelopes [ 159236 ]](https://i0.wp.com/assets1.tamsnetwork.com/images/EC042017NF/159236s.jpg?w=120&ssl=1 "Basic White Medium Envelopes [ 159236 ]")
![Paper Trimmer [ 152392 ]](https://i0.wp.com/assets1.tamsnetwork.com/images/EC042017NF/152392s.jpg?w=120&ssl=1 "Paper Trimmer [ 152392 ]")
![Stampin' Cut & Emboss Machine [ 149653 ]](https://i0.wp.com/assets1.tamsnetwork.com/images/EC042017NF/149653s.jpg?w=120&ssl=1 "Stampin' Cut & Emboss Machine [ 149653 ]")
![Multipurpose Liquid Glue [ 110755 ]](https://i0.wp.com/assets1.tamsnetwork.com/images/EC042017NF/110755s.jpg?w=120&ssl=1 "Multipurpose Liquid Glue [ 110755 ]")
![Stampin' Seal [ 152813 ]](https://i0.wp.com/assets1.tamsnetwork.com/images/EC042017NF/152813s.jpg?w=120&ssl=1 "Stampin' Seal [ 152813 ]")
![Mini Stampin' Dimensionals [ 144108 ]](https://i0.wp.com/assets1.tamsnetwork.com/images/EC042017NF/144108s.jpg?w=120&ssl=1 "Mini Stampin' Dimensionals [ 144108 ]")
![Stampin' Dimensionals [ 104430 ]](https://i0.wp.com/assets1.tamsnetwork.com/images/EC042017NF/104430s.jpg?w=120&ssl=1 "Stampin' Dimensionals [ 104430 ]")
THIS WEEK’S SAVVY SHOPPER SPECIALS

TRADITIONS OF CHRISTMAS
TUTORIAL BUNDLE
8 Exclusive Tutorials! Free Gift with $50* Stampin’ Up! Order in October 2025

SHOP NEW FALL & HOLIDAY
PRODUCTS BY STAMPIN’ UP!
Online Exclusives,
Mini Catalog, Kits & More!
SAVE FOR LATER
Hover over the graphic below and click the red Pinterest SAVE logo in the upper left corner to save this to your favorite Pinterest board! Enjoy quick & easy access to the tutorial whenever you want.

BEFORE YOU GO
- Get new project tutorials delivered free to your in-box! Subscribe Here (US only)
- Visit the GALLERY for more card ideas and free tutorials
- Enjoy this post? Leave a comment below… I love to hear from you!
Thanks for supporting our small family business!


