If you love adding rich texture and eye-catching dimension to your handmade cards, embossing folders are a must-have in your paper crafting toolkit! Whether you’re new to embossing or looking to level up your techniques, this post shares practical embossing folder tips and creative ideas to get the most from your folders. From crisp impressions to fun inking tricks, you’ll discover easy ways to make your projects pop with professional-looking detail.
TOP EMBOSSING FOLDER TIPS
ENHANCED EMBOSSING: Get a crisper, more defined image by lightly spritzing both sides of your paper immediately before embossing (see photo below)
SPRITZ WITH WATER
Pros- Cheap & Easy-Nothing Special to Buy
Cons- Can Warp Paper, Takes Longer to Dry- May Delay Completing Project
SPRITZ WITH ISOPROPYL [Rubbing] ALCOHOL {my personal preference}
Pros- Dries Quickly, Doesn’t Warp Paper, Inexpensive, Readily Available
Cons- Has an Odor (but quickly dissipates without a trace)
SEE THE DIFFERENCE: Look closely at the photo below… they’re two pieces of the same cardstock, embossed exactly the same. Can you tell which piece was spritzed before embossing?
It’s the one on the right… while the difference may seem subtle, it’s more pronounced in person and is worth the extra step!
See the difference spritzing makes!
STACK THE RIGHT SANDWICH: Not to eat :), but for your Stampin’ Cut & Emboss Machine (or similar)
3D & Hybrid Folders: Base 1 + Folder + Plate 4
Standard Folders: Base 1 + Plate 3 + Folder + Plate 3
FOLD FIRST: When possible, place folder with the fold toward the center of the machine, so it enters the machine first. This will reduce any risk of damage to your folders from the pressure.
DOUBLE THE POSSIBILITIES: Each folder has two sides- an EMbossed side that creates a raised image and a DEbossed side that creates a recessed image… depending on the folder, each side can look very different and offer tons of possibilities!
TECHNIQUE 1: ENHANCE WITH COLORING
Enhance the image with coloring!
This technique works especially well on embossing folders with large images, like the new Sunflower 3D Embossing Folder. For the card above, color the recessed [debossed] areas.
SAVVY TIP: If you like fuss-free coloring, add the second technique below, like I did on the featured card!
Another option is to color the raised [embossed] image on the opposite side… play with both for different results!
COLORING OPTIONS: Add color with any of the following tools… each method offers a different look, so be creative and experiment!
Watercolor Brushes (use watercolor paper and heavily spritz beforehand for the best impression)
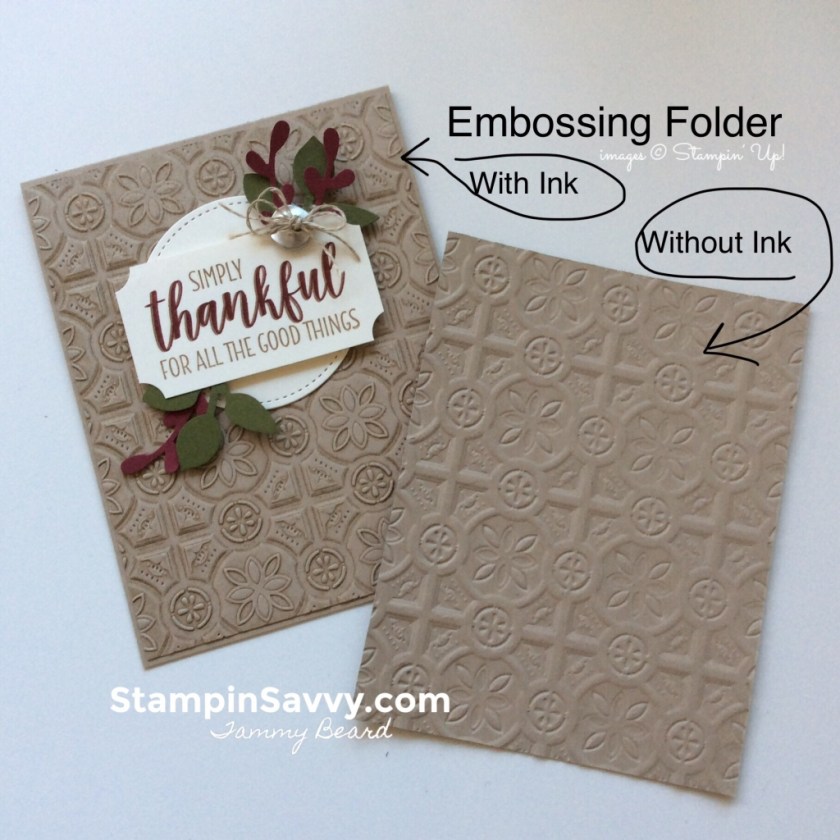
TECHNIQUE 2: APPLY INK AFTER EMBOSSING
Changing the look with an ink pad!
In the example above, place the debossed image back into the embossing folder pattern, so it acts as a support to the paper. With an open ink pad tilted slightly at an angle so you’re only using the edge, lightly drag the pad across the paper, adding ink to the raised areas only (photo above).
Rinse ink off folder and dry embossing folder when complete
If you missed coloring any areas from the previous step, they’ll stand out (see white spots in photo above). No worries… just go back and do minor touch-ups.
FEATURED CARD MEASUREMENTS
Early Espresso Cardstock: 8-1/2″ x 5-1/2″, score and fold on long side at 4-1/4″ (card base)
Basic White Cardstock: 4-1/4″ x 5-1/2″, emboss with Sunflower 3D Embossing Folder
After completing Technique 1 and 2, trim to 5″ x 3-3/4″
Gold Foil Cardstock: 5-1/8″ x 3-7/8″; adhere embossed panel above, wrap 3 times with Linen Thread and tie into bow- secure in place with a Mini Glue Dot. Adhere panel to card base with Stampin’ Dimensionals. Add sentiment and embellishment… done!
The difference between highlighting the embossed and debossed sides!
EXPLORE THE OPTIONS: Get different looks when you apply ink to the embossed and debossed sides. For another variation, apply ink with a Brayer, instead of the pad. Have fun playing!
COMPARE RESULTS: In the photo above, the left piece shows the results of a White Craft Ink Pad applied to the Debossed Side of Night of Navy Cardstock; the right piece has the same ink applied to the Embossed Side.
EXPERIMENT: Try white or metallic ink on dark cardstock. Or dark ink on light cardstock (like the featured card )… the possibilities are endless!
TECHNIQUE 3: APPLY INK BEFORE EMBOSSING
To ink, or not to ink? Silly question!
Apply ink to the inside of the embossing folder before embossing, instead of inking the paper afterward. Ink can be applied directly with a pad, or with a brayer for a softer, more detailed look.
Combine techniques 1 and 3 to create a beautifully simple textured focus for your card!
In the example below, die-cut (or punch) a large circle from Basic White Cardstock; apply Basic Grey Ink to the inside lid of your embossing folder with a Brayer (Zinnia 3DEF shown-retired); position circle where you want within the pattern and emboss on your Stampin’ Cut & Emboss Machine. Select the embossed image you want to showcase and color, as desired (flower colored with Stampin’ Blends Alcohol Markers). Easy-peasy!
Create a beautiful focal image in minutes!
BONUS INSPIRATION: EMBOSSING OPTIONS
Embossing isn’t just for cardstock, try vellum (shown below), or designer or specialty paper.
SAVVY TIP: To prevent thinner paper like vellum and designer paper from cracking or tearing under pressure, sandwich between parchment, wax or other thin paper.
Embossed vellum is luxurious!
Want a classy gift idea that is quick & easy to make and oh, so affordable?
Emboss a set of Note Cards & Envelopes for a sophisticated gift sure to be a hit… very popular with my family & friends! (photo below)
Want to come back to these ideas later? Hover over the graphic below and click the red Pinterest SAVE logo in the upper left corner to save this to your favorite Pinterest board! Enjoy quick & easy access to the tutorials whenever you want.
Thanks for shopping with me and supporting our small family business!
About Tammy Beard
Stampin' Up!® Independent Demonstrator who loves crafting handmade happiness with paper, stamps and ink!❤ SHOP Stampin' Up!® in the USA @ StampinSavvy.com/Shop
Imagine my sheer delight when I saw all these awesome tips on getting even more out of my embossing folders! I can hardly wait to try them out!! Having so many examples, tips, & instructions all in one place is like finding a treasure!!! TYFS your creative talent!
Imagine my sheer delight when I saw all these awesome tips on getting even more out of my embossing folders! I can hardly wait to try them out!! Having so many examples, tips, & instructions all in one place is like finding a treasure!!! TYFS your creative talent!
![Sunflower 3 D Embossing Folder [ 166145 ]](https://i0.wp.com/assets1.tamsnetwork.com/images/EC042017NF/166145s.jpg?w=140&ssl=1 "Sunflower 3 D Embossing Folder [ 166145 ]")


![Greetings For All Mix & Match Ephemera Pack (English) [ 164862 ]](https://i0.wp.com/assets1.tamsnetwork.com/images/EC042017NF/164862s.jpg?w=140&ssl=1 "Greetings For All Mix & Match Ephemera Pack (English) [ 164862 ]")
![Gold Foil Sheets [ 132622 ]](https://i0.wp.com/assets1.tamsnetwork.com/images/EC042017NF/132622s.jpg?w=140&ssl=1 "Gold Foil Sheets [ 132622 ]")
![Neutrals Adhesive Backed Sequins [ 161627 ]](https://i0.wp.com/assets1.tamsnetwork.com/images/EC042017NF/161627s.jpg?w=140&ssl=1 "Neutrals Adhesive Backed Sequins [ 161627 ]")
![Linen Thread [ 104199 ]](https://i0.wp.com/assets1.tamsnetwork.com/images/EC042017NF/104199s.jpg?w=140&ssl=1 "Linen Thread [ 104199 ]")
![Basic White 8 1/2" X 11" Cardstock [ 166780 ]](https://i0.wp.com/assets1.tamsnetwork.com/images/EC042017NF/166780s.jpg?w=140&ssl=1 "Basic White 8 1/2\" X 11\" Cardstock [ 166780 ]")
![Early Espresso 8-1/2" X 11" Cardstock [ 119686 ]](https://i0.wp.com/assets1.tamsnetwork.com/images/EC042017NF/119686s.jpg?w=140&ssl=1 "Early Espresso 8-1/2\" X 11\" Cardstock [ 119686 ]")
![Early Espresso Classic Stampin' Pad [ 147114 ]](https://i0.wp.com/assets1.tamsnetwork.com/images/EC042017NF/147114s.jpg?w=140&ssl=1 "Early Espresso Classic Stampin' Pad [ 147114 ]")
![Peach Pie Stampin’ Blends Combo Pack [ 163827 ]](https://i0.wp.com/assets1.tamsnetwork.com/images/EC042017NF/163827s.jpg?w=140&ssl=1 "Peach Pie Stampin’ Blends Combo Pack [ 163827 ]")
![Daffodil Delight Stampin' Blends Combo Pack [ 154883 ]](https://i0.wp.com/assets1.tamsnetwork.com/images/EC042017NF/154883s.jpg?w=140&ssl=1 "Daffodil Delight Stampin' Blends Combo Pack [ 154883 ]")
![Lemon Lolly Stampin’ Blends Combo Pack [ 161673 ]](https://i0.wp.com/assets1.tamsnetwork.com/images/EC042017NF/161673s.jpg?w=140&ssl=1 "Lemon Lolly Stampin’ Blends Combo Pack [ 161673 ]")
![Old Olive Stampin' Blends Combo Pack [ 154892 ]](https://i0.wp.com/assets1.tamsnetwork.com/images/EC042017NF/154892s.jpg?w=140&ssl=1 "Old Olive Stampin' Blends Combo Pack [ 154892 ]")
![Stampin’ Blends Medium Combo [ 159462 ]](https://i0.wp.com/assets1.tamsnetwork.com/images/EC042017NF/159462s.jpg?w=140&ssl=1 "Stampin’ Blends Medium Combo [ 159462 ]")
![Stampin' Spritzer [ 126185 ]](https://i0.wp.com/assets1.tamsnetwork.com/images/EC042017NF/126185s.jpg?w=140&ssl=1 "Stampin' Spritzer [ 126185 ]")
![Stampin' Dimensionals [ 104430 ]](https://i0.wp.com/assets1.tamsnetwork.com/images/EC042017NF/104430s.jpg?w=140&ssl=1 "Stampin' Dimensionals [ 104430 ]")
An amazingly helpful post! Love seeing the examples AND how to create that effect!
Lovely to hear from you Rachel… delighted you found the tips & ideas helpful. Happy crafting❤️
Thank you– this card is lovely and now I am obssessed with this technique!
Love to hear that Julia… happy crafting!❤️
Thank you so very much for the details! Your artistry is amazing. Looking forward to seeing more.
Thanks Nancy… delighted the ideas inspired you!
Happy crafting ❤️
Imagine my sheer delight when I saw all these awesome tips on getting even more out of my embossing folders! I can hardly wait to try them out!! Having so many examples, tips, & instructions all in one place is like finding a treasure!!! TYFS your creative talent!
Thank you for your sweet comments, Cece… thrilled to hear it was helpful!
Happy crafting❤️
Imagine my sheer delight when I saw all these awesome tips on getting even more out of my embossing folders! I can hardly wait to try them out!! Having so many examples, tips, & instructions all in one place is like finding a treasure!!! TYFS your creative talent!
This was a great presentation of ideas for embossing! Thank you so much for sharing!
Thanks so much Rachel… so nice to hear from you!❤️
Beautiful, Tammy!
Hi Patti! Thanks for visiting ❤️
Thanks, Tammy, for these great ideas for using this beautiful embossing folder, plus more. Enjoy your day!
Thanks sweet Hilda… happy crafting!❤️
Wow, what a great treasure trove of embossing ideas! Thanks so much for sharing 🙂
You’re so welcome Toni… have fun playing with these ideas! ❤️
Thank you for sharing this wonderful resource!
I’m delighted to hear you enjoyed the ideas, Penny… happy crafting!